Getting Started with Sharepoint Designer: Part 2
Welcome back to our Getting Started with Sharepoint Designer series. These tutorials assume that you have some experience with HTML and CSS, but none with Sharepoint Designer or hosted Sharepoint Services.
Last time, we downloaded Sharepoint Designer and hooked it up to our hosted Sharepoint account. We also created a blank Sharepoint site, ready to customize to our desires. This time, we are going to learn about customizing your blank website and prepare it for content.
First things first: we need to start up Sharepoint Designer if it’s not going already. Navigate to “file” and choose open site. Type in the URL of the site we created last time and click go. You’ll have to log in, so do so, and we will get the site directory structure in the main window. Double-click on the file named “default.aspx”, and it will open in the design window.
One of the first things you will notice is that there are a lot of areas where you get the “no-no” symbol, a circle with a slash through it.
Anywhere you see this symbol is non-editable. Not that it can’t be changed, but it can’t be changed in the design view.
Another thing you will see a lot of is “Placeholder”.

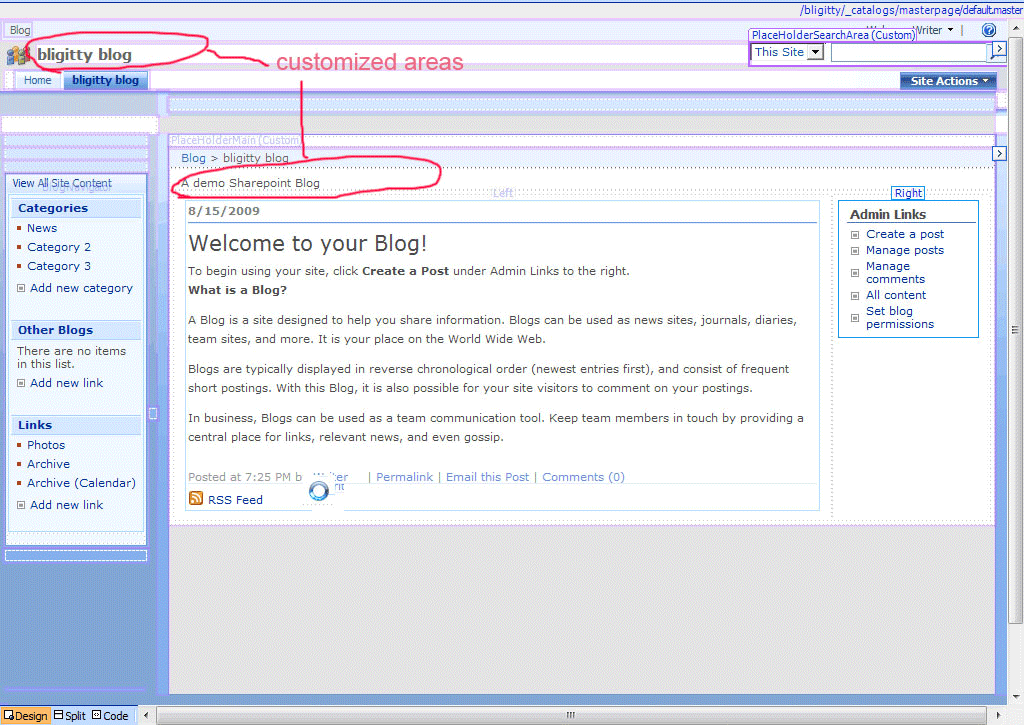
This is used to designate an area that is populated with one type of content or another. The two types of placeholder are “(Master)” and “(Custom)”. A Master Placeholder reserves space for text or other elements that are supplied by the Master Page(s). Custom Placeholders are areas that you have already provided or are supposed to provide, like page descriptions.
In this view most areas can be moved, hidden, or deleted altogether. To add text or pictures to any of the “(Custom)” areas, just click in the area and type what you want, or drag a picture from the Folder List to the left.

To change the content of a “(Master)” area, you have to click the arrow in the top right corner, and select “Create Custom Content”. After you do this, the area is editable like any other Custom area.
So far, we have created a site and customized it with text, pictures and given it a new name. Next, we will check out Web Parts, what they are, and what we do with them. Until then, the best advice I can give you is; don’t be afraid to explore. The more time you spend looking around your Sharepoint site or Sharepoint Designer software, the more you will understand and be capable of. Now sign up with Apps4Rent for Hosted SharePoint 2013.


