Getting Started with Hosted SharePoint: SharePoint as a Blog
-
 Last updated: 22 January 2013
-
 Hosted SharePoint Articles,Microsoft SharePoint Hosting,SharePoint Hosting Articles,Windows SharePoint Hosting
 -
 Written by
Editorial Team
Written by
Editorial Team
- Tags: Best SharePoint Hosting Pricing, hosted SharePoint, hosted SharePoint site
This is the first blog in a series designed to help answer the questions “What can SharePoint do?”, and “How do I do that with SharePoint?”. Today we are going to show you how easy it is to implement a blog using your hosted SharePoint account. Later on in the series, we will take on subjects like basic websites, SharePoint design and different types of sharing and collaboration servers.
On to SharePoint as a Blog.
The very first thing we will do is navigate our preferred web browser to the URL of our hosted SharePoint account. When the authentication pops up, enter your user name and password, and press enter.
Once logged in you will be presented with the default view of your Administration panel. The SharePoint site that I am using as a demo for this series looks like this:

From here, we need to click on “View All Site Content” at the top of the navigation bar at the left. This brings up a page that gives you information on all the content that is currently hosted by your site. My demo site is already set up for one blog, so it looks like this:

The next step is to click the “Create” button to go to the “Create” page. This is where you will go to make anything for your site, but for right now, we are looking for “Sites and Workspaces”. Follow that link to the “New Sharepoint Site” page. Here is where we really get started:
1. Give your blog a name and a description. My demo blog is going to be “Bligitty Blog”. Remember that the title you choose will be displayed on each page of the site.
2. Designate a web address for your blog. You will notice that the URL of your blog is the URL of your main site with the addition of the name you choose.
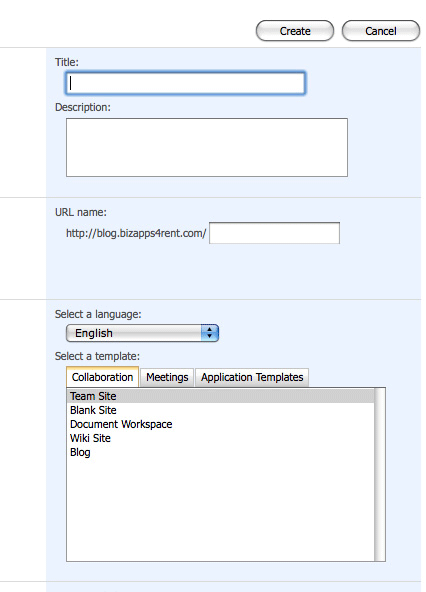
3. Select your language and template. The template we are going to use is “Blog”, so select it in the template list under the “Collaboration” tab.
4. Set permissions. Here you have the choice to use the same permissions as your main site, or use a unique set of permissions for your blog. For the purposes of the tutorial, we are going to use the same settings as our parent site.
5. Set up your navigation and navigation inheritance. These two options allow you to add links from this site in the navigation of your main site and inherit the top menu bar if you wish. We are choosing “yes” for all of these options, but you can just as easily say “no”.
6. Click the “Create” button. Bang! Done and done.
You now have a fully functioning SharePoint based blog, ready to rock and roll, and inform the world! Admin links to the right allow you to manage or add new posts, set blog permissions, manage comments and other blog admin tasks. Now get to work posting your content! One can also upgrade to a low cost dedicated SharePoint server with hyper-v hosting. Now sign up with Apps4Rent for SharePoint 2013 Hosting solutions.