
Migrating Windows Server 2008 to Azure
The Extended Support for Windows Server 2008 has already ended on January 14th, 2020. This has left many businesses vulnerable to data breaches if they haven’t upgraded their servers. Since the server is out in the open without any official security cover, it is breeding ground for potential attackers and hackers. Obviously, the frequency and complexity of attacks have increased leaving the once-safe system vulnerable to security and compliance risks.
The products of the Windows 2008 series were trusted workhorses for a long time. Since it is all history now, the time has come to upgrade infrastructure and applications to be cloud compliant. Though users can opt for the Windows Extended Security Updates (ESU) for their Windows 2008 Server which is valid for 3 years, we recommend moving your Windows Server 2008 to newer systems such as Azure.
Let’s discuss how you upgrade and migrate Windows Server 2008 to Azure.
Before You Migrate from Windows Server 2008 to Azure
Businesses must prepare beforehand for a successful migration from Windows Server 2008 to Azure. Below are some of the steps that must be taken before starting the migration process:
- Procure appropriate Azure and Office 365 licenses.
- Ensure that there is a global administrator in Office 365 who has an owner role in Azure.
- Ensure that the domain part of the user account used in the migration is @tenant.onmicrosoft.com.
- Upgrade the Configuration Server and other process servers to Azure Site Recovery software version 9.19.0.0 or later.
- Ensure that the servers that are being migrated have .NET Framework 3.5 Service Pack 1 so that the mobility service works.
- Ensure that the vmstorfl.sys driver is available in the server that is being migrated.
Step 1: Using Azure Migrate to Discover the Servers
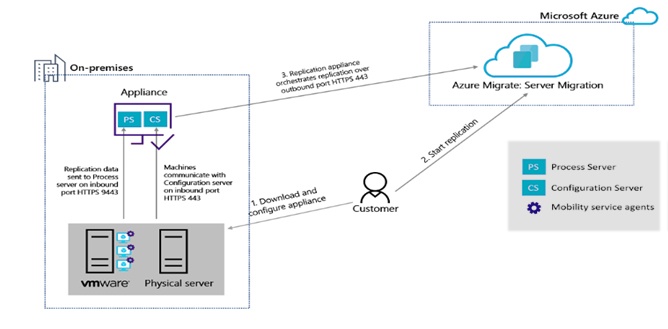
Azure Migrate Server Migration uses a replication appliance to replicate machines to Azure. The replication appliance runs the following components.
- Configuration server: The configuration server coordinates communications between on-premises and Azure and manages data replication.
- Process server: The process server acts as a replication gateway. It receives replication data; optimizes it with caching, compression, and encryption, and sends it to a cache storage account in Azure.
First of all, we will prepare a server where the Azure Migration assessment tool will run i.e the process server which will discover whether the machine will be able to move to azure or not.
Step 2: Replicate the Target Server to Azure Using Azure Replication Tool
After discovering machines using the assessment tool, we will now move on to replicate the target server to azure using azure replication tool.
Here’s how the entire process looks like:

Step 3: Configure the Target Environment
These steps prepare the Azure infrastructure to receive the migration data.
- Navigate again to the Prepare infrastructure menu and select Target.
- Select the Azure subscription that you have procured. and choose Resource Model in the dropdown for the deployment model below it.
- Click OK.
Step 4: Make a Replication Policy
The replication policy specifies the time constraints for retaining data and creating backup recoveries if there are interruptions.
Follow the steps below to create a replication policy.
- Navigate to Site Recovery infrastructure and select +Replication Policy under Replication Policies.
- Type in the policy name in Create replication policy.
- Set the recovery point objective (RPO) limit in the RPO threshold to specify how often data recovery points are created.
- Specify the retention window in the Recovery point retention.
- The App-consistent snapshot frequency specifies how often application-consistent snapshots are created in recovery points.
- Click on OK once you are satisfied with the settings.
Step 5: Enable the Replication of Windows Server 2008
The last step to migrate Windows Server 2008 to Azure is to enable replication using the appropriate settings.
- Click on Replicate application and then navigate to Source where the Configuration Server has to be selected.
- Select Physical machines in Machine type and the process server (Configuration Server) and click OK.
- In the Target view, select the subscription, resource group, Azure storage account, Azure network, and subnet.
- Select Configure now for selected machines or Configure later depending upon how you want to apply the network settings.
- Click on +Physical machine in Physical Machines and specify the name and IP address along with other details like operating system details.
- Install Mobility service by selecting the appropriate account in Configure properties under Properties.
- Verify the replication policy in the Configure replication settings in Replication settings.
- Finally, click on Enable Replication.
Final Thoughts on Migrating Windows Server 2008 to Azure
The end of the replication completes the migration process from Windows 2008 Server to Azure. However, you will need to confirm that you are comfortable using the Azure infrastructure. Test, the connectivity of the VMs and try resizing them. Ensure that the server is being backed up in Azure.
The migration can appear to be challenging. But hopefully, this writeup has simplified the process. As a certified Microsoft Gold Partner and a Tier 1 CSP for Office 365 and Azure, Apps4Rent helps businesses implement Microsoft solutions and configure them to meet their requirements. We provide 24/7 technical support via phone, chat, and email.
Contact our support team to know about our managed Azure services.


